Make your ancestors proud – Help keep quilt history alive!

Make your ancestors proud – Help keep quilt history alive!

February 2023

Covering Quilts

Make your ancestors proud – Help keep quilt history alive!

by Sandra Starley


Preserving quilt history is easy to do and so important.

The first step: share your quilt story with friends and family. Tell friends about your quilt history journey. Share your vintage and antique quilt finds with people. Post or write about new quilt history books or even old ones (you never know which ones people may have missed). An added benefit is that you may find a few resources that you have not seee first step:n before or ones you have forgotten. Also, this is a good reminder to revisit old buddies on your bookshelf. You will be surprised about what treasures you will find on a second look through with more experienced eyes. Starting discussions about quilt history topics on social media is a great way to share your love of antique and current quilt making. You will likely make new quilty friends and learn along the way. And again, I would strongly recommend joining the American Quilt Study Group, the nation’s premiere quilt study organization www.americanquiltstudygroup.org

Second step: Do not forget that tomorrow’s quilt history is being made today. Now is the time to document and label your own quilts (ones you have made). It is also important to document any quilts that you collect too. A label should have basic information like the year the quilt was made (or years), the name of maker and the name of recipient if the quilt was given away or donated. Also include the title or name of the quilt and why it was made (a special occasion, fabric challenge, experiment?). It is also good to note the pattern or design information (was it an original design, a commercial pattern, or a combination of both). For an antique quilt – document as much of that previous list as you can based on known information or educated inferences. Then take some photographs of your quilts, at least a full photo and a few close-ups. Finally, create a paper trail: write up a brief synopsis of the label information along with photographs to properly record your quilting history and collection. It is a good idea to keep these records in a separate location from your quilts.

Detail of Seven Sisters quilt

Quilt Top made in Red Hill, PA

A quilt top made in Red Hill, PA, in 1911 by Gladys (9) and Earl (5) Balmer, from the Starley Quilt Collection. Documented with the Quilt Alliance. (Image courtesy of the author)

Third step: share your quilt making story with the public through the wonderful resources of the Quilt Alliance; see them and join them at www.quiltalliance.org. The Quilt Alliance offers several easy ways to document your quilt story. First is the quick and easy “Go Tell It!” project that involves a simple formula for sharing and saving quilt history. “One quilt, one person, one camera + three minutes = another quilt story saved.” Just follow that recipe (see more details on their website) and record the story of your favorite quilt for future generations. They also have the Quilters Save Our Stories (QSOS) that is a longer format interview option. Further your preservation efforts by having a few of your quilts put on the national quilt history database of the Quilt Index www.quiltindex.org. The Quilt Index is a public archive, and anyone can submit quilts to the site. They have recorded more than 87,000 quilts and they have incredible research resources for you to explore.

Fourth step: Speaking of exploring, check your parents’ attic or grandma’s cedar chest and see if there are any family quilts that need to be preserved and documented. Ask family members if there are any old quilts hidden away. You never know what quilt treasures may be discovered from your own family. Start searching and learning now; a perfect way to start the new year.

Sandra Starley is nationally certified quilt appraiser, quilt historian, and avid antique quilt collector. She travels throughout the U.S. presenting talks on antique quilt history, fabric dating classes and trunk shows as well as quilting classes. Learn more at utahquiltappraiser.blogspot.com. Send your comments and quilt questions to SandraStarley@outlook.com

Seven Stars for seven sisters, a pattern history

December 2022

Covering Quilts

Seven Stars for seven sisters, a pattern history

by Sandra Starley


Patchwork Patterns

“Seven Stars is a romantic-sounding name, but the quilt really deserves this lofty title. It’s a beauty,” Ruby McKim wrote in “101 Patchwork Patterns” in 1931. Start with a star and you cannot go wrong. Add six more and you have the recipe for the classic Southern pattern: Seven Sisters. In line with this year’s goal to learn something new and challenge yourself, this is the perfect design for you to try.

It is an intricate and visually engaging block composed of seven stars grouped in a staggered set to create a hexagon or a circle design. It is generally made with seven diamond stars pieced into a hexagon shape with diamonds or hexagons between the stars. A rarer group has seven diamond stars or sometimes flower shapes that are pieced into circles and then usually set into square blocks. With myriad ways to construct the blocks, set them, and then color them, “Seven Stars” may really refer to the infinite number of versions one can create of this versatile block.

The pattern has a rich and intriguing history. The stories span centuries from starry night skies full of mythical Greek goddesses, and tales of Confederate star flags, to the simply descriptive since the block, is composed of seven stars. Mystery surrounds the pattern’s origins and the meanings behind the names.

Heavenly Inspiration. The Mississippi Quilt Project documented a “fondness for the star pattern known as ‘Seven Sisters,’ a name taken from the cluster of stars in the constellation of Taurus with the astronomical name of ‘the Pleiades.’ Some oldtimers thought you could predict the weather according to the number of ‘sisters’ you could see on any given night, and that may have contributed to its popularity among Mississippi quilters.” The Greek myth of the seven daughters of the Titan God Atlas, trapped in the heavens, has been around for thousands of years. Seven sisters who have become stars applies equally to both main block names.

Detail of Seven Sisters quilt

Detail of Seven Sisters quilt

Detail of Seven Sisters quilt top, circa 1900, from the Starley Antique Quilt Collection. (Image courtesy of the author)

Seven Star Confederate flag – A Southern origin for the Seven Stars name is related to the Civil War and the seven stars on the first Confederate flag. The stars represented the first seven states to secede from the Union. There were seven-star flags and other textiles made then, so it is possible some people selected the pattern to reflect their political positions, or to “vote with their needles.” That flag was used for less than three months in 1861, but the powerful symbolism likely inspired quilters to recreate it with this pattern.

While Seven Sisters is the most recognized name, the pattern was originally published as Seven Stars in the 1895 Ladies Art Company catalog.

The descriptive Seven Stars in a Cluster, Capper’s Weekly, 1928 followed as well as Seven Stars, Kansas City Star, 1931. In 1933, the Seven Sister’s name appeared in Nancy Cabot’s column. Other names from this period include Boutonniere, Building Blocks, Star Bouquet, and Rolling Star.

Whatever the name, it is a challenging pattern. Hexagon versions tend to be hand-pieced often with the use of the English paper piecing technique which employs diamond-shaped paper templates. Each star section is created with six diamonds. It is also a great pattern to practice regular hand piecing for the inset seams. Why not try a block for a beautiful little star pillow? A perfect present for your sister or any star in your life.

Sandra Starley is nationally certified quilt appraiser, quilt historian, and avid antique quilt collector. She travels throughout the U.S. presenting talks on antique quilt history, fabric dating classes and trunk shows as well as quilting classes. Learn more at utahquiltappraiser.blogspot.com. Send your comments and quilt questions to SandraStarley@outlook.com

Go Small or Go Home – Let’s Make a Mini Quilt

November 2022

Covering Quilts

Go Small or Go Home – Let’s Make a Mini Quilt

by Sandra Starley


Mini quilts

In our continuing journey of exploration and challenges, what could be better than making a little treasure? Why not try your hand at creating a true miniature quilt? Mini quilts are the perfect choice for experimenting and playing in your sewing room. I know many of you have shied away from mini quilts for fear of little pieces, but they are really fun. Read on for the myriad benefits of little quilts.

What Is a Miniature Quilt?

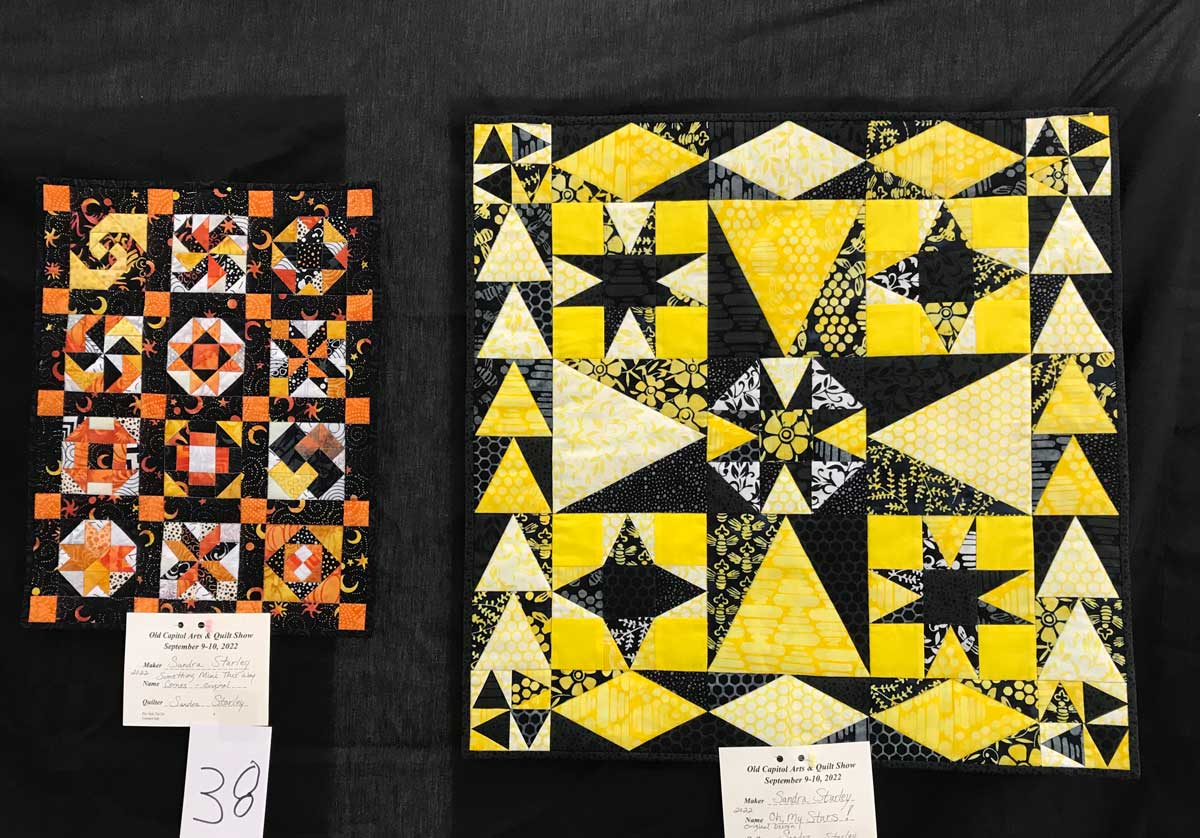
A true miniature quilt should be done in a small scale with small pieces rather than making just one large, pieced block. In addition, for most quilt shows or competitions, the rules are that the finished quilt must measure 24 inches or smaller. Another important consideration is the scale or proportion of the fabrics. Solid fabrics work well in miniatures. Miniature quilts are an effective way to highlight little novelty prints and fussy cut motifs. But do not forget large-scale prints, which can be creatively cut to look like several different fabrics.

UFO quilt

Mini Quilts

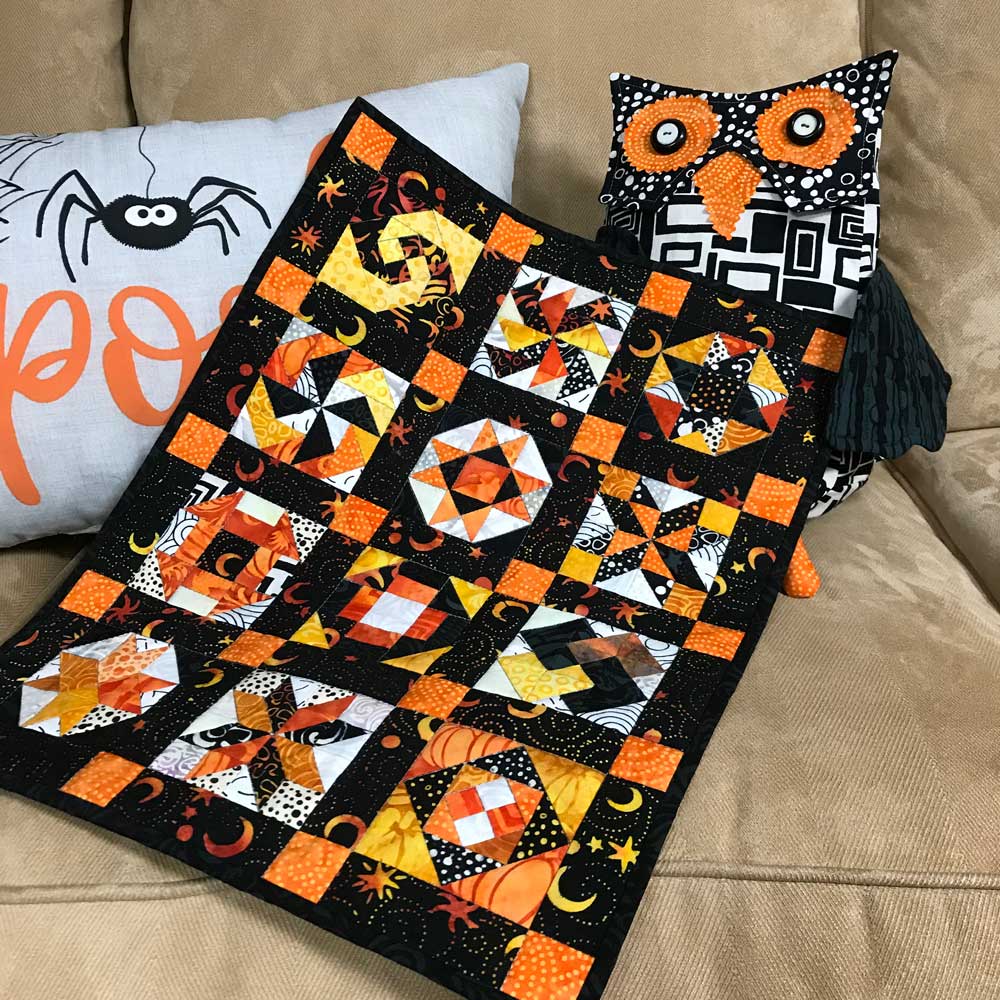
Something Mini This Way Comes, 2022, Sandra Starley, 13″ x 17″ inches (3-inch blocks). Image courtesy of the author

Why Work Small?

Working small means that you do not need a lot of material. Charm squares and layer cakes and other pre-cuts are perfect for miniature quilts. And it is a terrific way to make a dent in your overflowing bucket of scraps. We all have leftover cuts and bits from old projects – a miniature quilt is just waiting to be discovered in the forgotten pieces. You will be amazed at how far scraps will go when you are making a 3- or 4-inch block. A miniature quilt can give you a big bang for your buck.

Easier to Make and Finish

You only need to make a few little blocks for your miniature quilt — a much more doable time investment than a full-sized quilt. Pick four or five blocks you have always been interested in and create a little sampler. Because the finished quilt may only be 12 or 24 inches square, it is much easier to hand or machine quilt. No wrestling with a sewing machine like when trying to quilt a king size quilt.

A Great Way to Practice Your Sewing Skills

When working small, it is important to sew accurately unless you are doing improvisation, free-form, or wonky quilts. Practice sewing a scant quarter-inch seam allowance and take it a bit slower to get precise results. I strongly recommend two books by Sally Collins, Small Scale Quiltmaking and Mastering Precision Piecing if you want to learn how to take your piecing skills to the next level. Just the other day my friend and I mentioned how much we have been influenced by her class from 20 years ago. There are also many other wonderful books and online resources to guide you through creating a mini quilt. You can even join a mini quilt guild or miniature quilt Facebook group.

Try A New Technique

If you want more relaxed sewing, I suggest foundation paper piecing, which is well suited to tiny piecing. As long as you sew right on the lines you will get wonderful results. You do not have to worry about perfect cutting or seam allowances. The technique allows you to sew exceedingly small pieces accurately and easily. Remember to experiment and play, and do not be surprised if you want to make more after trying one; miniature quilts can be quite addicting.

Sandra Starley is nationally certified quilt appraiser, quilt historian, and avid antique quilt collector. She travels throughout the U.S. presenting talks on antique quilt history, fabric dating classes and trunk shows as well as quilting classes. Learn more at utahquiltappraiser.blogspot.com. Send your comments and quilt questions to SandraStarley@outlook.com

Share your quilts – Enter a quilt show today

October 2022

Covering Quilts

Share your quilts – Enter a quilt show today

by Sandra Starley


Since we are working on getting out of our comfort zones and trying something new this year, I thought I’d inspire you to share your quilts with the world. This is a gentle nudge especially for those quilters who have never put a quilt in a quilt show or a local county fair. It is also a push for those who have only showed quilts in small local shows to branch out and try a larger venue like a regional or national show. And if you have shared your quilts in the past but have not done so for several years, this is a prompt to get busy and get your work out there again.

Show off your talent

If you are new to shows, please do not be afraid to join in the fun. Many small shows are very easy to enter by simply bringing in your quilt and giving them your name and a bit of information about your quilt. While some bigger quilt shows can be very competitive and turn away many entries, local and regional shows are often eager for more quilts to fill their racks. Remember, it is pretty hard to hold a quilt show without quilts. If you like seeing beautiful quilts, you should share your work, too. You never know when you will inspire someone else or make someone smile with your quilting. And seeing your quilts hanging may give you a boost as well. It is empowering to experience your work shown as art.

Try out a bigger show or a virtual show

If you have only shown locally, why not try to enter your quilts into a larger show? You may need to practice some new skills, like photography or online entry programs, but that is always good exercise for your brain. There are many shows now that allow you to enter online via photos and then you send or bring in your quilt if it is accepted. Other shows are completely virtual or online and you enter by sending in a photo or posting an image at the show website. Do a search for quilt shows, quilt competitions, and quilt challenges and you will be amazed at all the possibilities.


UFO quilt

Two of my newly made quilts

Something Mini This Way Comes (L), Oh My Stars! (R). These are two of my newly made quilts hanging in a local Utah show, September 2022. Quilts were designed and made by Sandra Starley from Island Batik fabrics. (Photo provided by the author)

Read (and follow) the rules

One of the most important steps to successfully entering quilt shows, challenges, or other competitions is to read and follow the show rules. There may be guidelines on quilt size such as a minimum or maximum size allowed, or certain sizes placed in specific categories. Just pay attention to those details and make sure you enter the right quilt category. Do not be afraid to reach out to the show officials to ask questions. Another common issue is the age of the quilt aka when it was made. Many shows will only exhibit quilts made recently or within the last two or three years.


Tell Your Story

Remember to label your quilt with the important details and information on the making of your quilt. Your name and the name of the quilt and the date of the quilt’s completion are a good start. Give credit where credit is due and note if you used a commercial pattern and share the pattern name. If someone else quilted it, definitely add them to the label and your quilt entry form. Add some details about what inspired you to make the quilt as people like to read a story and learn about your process. Quilt shows are an important part of quilting and keeping the art of quilting alive. Join in the fun and share your quilts!

Sandra Starley is nationally certified quilt appraiser, quilt historian, and avid antique quilt collector. She travels throughout the U.S. presenting talks on antique quilt history, fabric dating classes and trunk shows as well as quilting classes. Learn more at utahquiltappraiser.blogspot.com. Send your comments and quilt questions to SandraStarley@outlook.com

Zigzag patterns for the win!

September 2022

Covering Quilts

Zigzag patterns for the win!

by Sandra Starley


If you are like me, you find antique quilts very inspiring. Old quilts can really get your creativity flowing. Studying antique quilts is a wonderful way to not only understand history but also learn from early quilt makers. They did not have all the sewing tools and quilting gadgets that we have today, but they created some amazing quilts. And many of the most striking feature zigzags. The most commonly seen use of zigzags is a strippy vertical zigzag setting. Next most popular are horizontal settings followed by framing zigzag borders especially outer borders. The setting usually involves alternating light and dark triangles to create a zigzag look though rectangles, V blocks, and Flying Geese can also be used to make zigzags. Other blocks like Log Cabins can also create zigzags with careful color placement.

Zigzag patterns tend to have strong contrasting colors which along with the movement of the design gives a dynamic appearance to the quilt. Another name for the block or setting is Streak of Lightning, which gives a clue to its electric or graphic presence. No wonder zigzags are a very popular part of the quilting tradition. Quilt historians have noted that zigzags yield dramatic and showy quilts.


UFO quilt

Cactus Basket Zigzag Quilt

Circa 1870 Cactus Basket quilt in horizontal zigzag setting. From the Starley Antique Quilt Collection. (Image courtesy of the author)

Everything is better with zigzags!

The blocks can be used alone for a great effect but are wonderful when paired with other blocks to frame and highlight them. One thing you can learn from early quilters is that even the simplest blocks will look amazing if joined in an alternating arrangement with zigzags. When doing antique trunk shows, I have noticed that the audience always gasps with joy when I pull out a quilt with a zigzag setting. A particular crowd favorite is the pictured quilt, a circa 1870 Cactus Basket quilt with a horizontal zigzag setting. The purple rectangles create a triangular look that sets off the little scrappy baskets. Another reason zigzag settings are so effective is that they place the blocks on point, which adds movement and interest. And pro-tip: blocks go much farther when set on point. And combined with the volume added when they are framed with a medium sized zigzag sashing, and you will see fast progress.


Simply magic

As noted earlier, there are many different ways to create zigzag or chevron quilts or to add zigzag sashing or borders to other blocks. The simplest way is to cut light and dark triangles and piece them together in rows or strips. The trick is to offset them a half step (half the size of the triangle) when joining rows to create the zigzag shape. You will need two rows to see the zigzag. When making the zigzag set you also join the blocks with an offset with partial blocks at the beginning and end of each row. The offset is the secret sauce of the zigzag. There are several online tutorials that will help you in creating zigzag quilts or settings, do a search for zigzag quilt pattern and you’ll find plenty of guidance. You will find wonky zigzags and even zigzags that zig and zag across a quilt in modern diagonal patterns. And be sure to also do a search for antique zigzag quilts for a lot of wonderful historical inspiration. Remember to have fun and learn from the past while quilting for the future. My motto is: “you can’t go wrong with a zigzag quilt!” Give it a try.

Sandra Starley is nationally certified quilt appraiser, quilt historian, and avid antique quilt collector. She travels throughout the U.S. presenting talks on antique quilt history, fabric dating classes and trunk shows as well as quilting classes. Learn more at utahquiltappraiser.blogspot.com. Send your comments and quilt questions to SandraStarley@outlook.com