
Share your quilts – Enter a quilt show today

October 2022

Covering Quilts

Share your quilts – Enter a quilt show today

​

by Sandra Starley


Since we are working on getting out of our comfort zones and trying something new this year, I thought I’d inspire you to share your quilts with the world. This is a gentle nudge especially for those quilters who have never put a quilt in a quilt show or a local county fair. It is also a push for those who have only showed quilts in small local shows to branch out and try a larger venue like a regional or national show. And if you have shared your quilts in the past but have not done so for several years, this is a prompt to get busy and get your work out there again.

Show off your talent

If you are new to shows, please do not be afraid to join in the fun. Many small shows are very easy to enter by simply bringing in your quilt and giving them your name and a bit of information about your quilt. While some bigger quilt shows can be very competitive and turn away many entries, local and regional shows are often eager for more quilts to fill their racks. Remember, it is pretty hard to hold a quilt show without quilts. If you like seeing beautiful quilts, you should share your work, too. You never know when you will inspire someone else or make someone smile with your quilting. And seeing your quilts hanging may give you a boost as well. It is empowering to experience your work shown as art.

Try out a bigger show or a virtual show

If you have only shown locally, why not try to enter your quilts into a larger show? You may need to practice some new skills, like photography or online entry programs, but that is always good exercise for your brain. There are many shows now that allow you to enter online via photos and then you send or bring in your quilt if it is accepted. Other shows are completely virtual or online and you enter by sending in a photo or posting an image at the show website. Do a search for quilt shows, quilt competitions, and quilt challenges and you will be amazed at all the possibilities.
 

UFO quilt

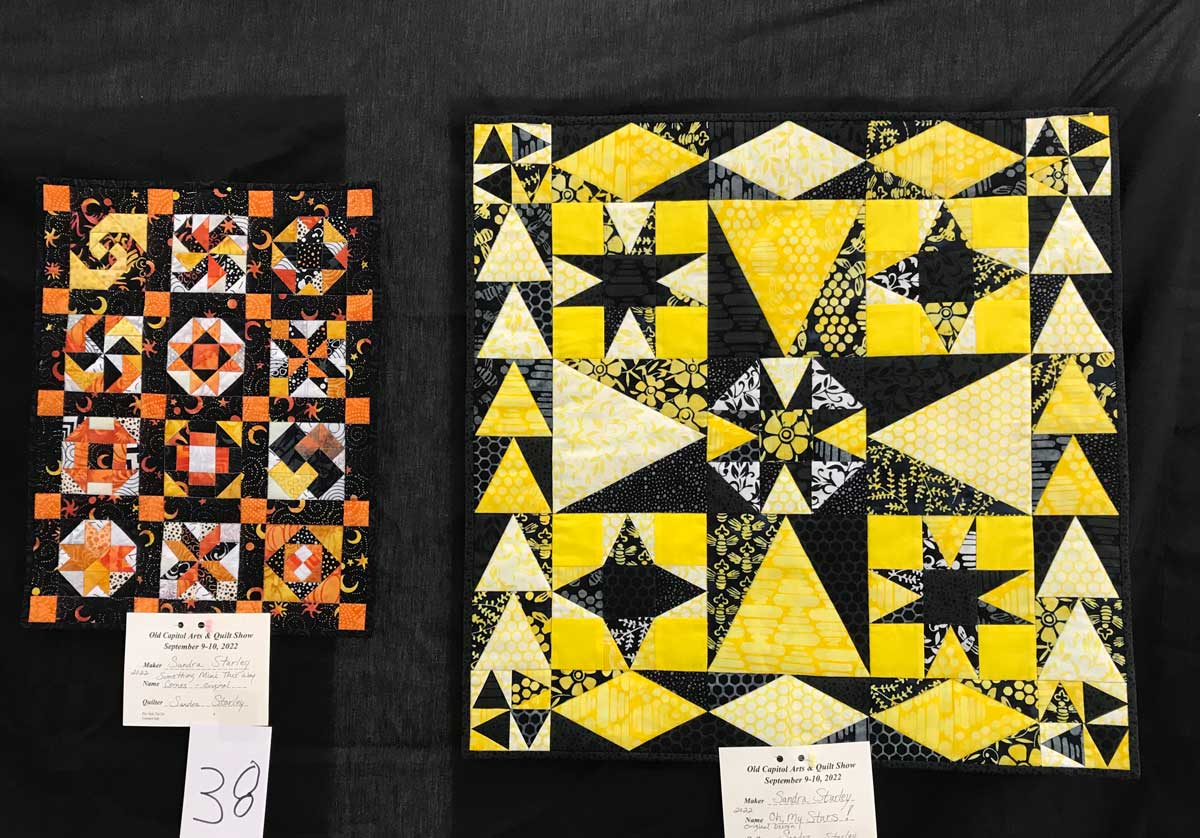
Two of my newly made quilts

Something Mini This Way Comes (L), Oh My Stars! (R). These are two of my newly made quilts hanging in a local Utah show, September 2022. Quilts were designed and made by Sandra Starley from Island Batik fabrics. (Photo provided by the author)

Read (and follow) the rules

One of the most important steps to successfully entering quilt shows, challenges, or other competitions is to read and follow the show rules. There may be guidelines on quilt size such as a minimum or maximum size allowed, or certain sizes placed in specific categories. Just pay attention to those details and make sure you enter the right quilt category. Do not be afraid to reach out to the show officials to ask questions. Another common issue is the age of the quilt aka when it was made. Many shows will only exhibit quilts made recently or within the last two or three years.


Tell Your Story

Remember to label your quilt with the important details and information on the making of your quilt. Your name and the name of the quilt and the date of the quilt’s completion are a good start. Give credit where credit is due and note if you used a commercial pattern and share the pattern name. If someone else quilted it, definitely add them to the label and your quilt entry form. Add some details about what inspired you to make the quilt as people like to read a story and learn about your process. Quilt shows are an important part of quilting and keeping the art of quilting alive. Join in the fun and share your quilts!

Sandra Starley is nationally certified quilt appraiser, quilt historian, and avid antique quilt collector. She travels throughout the U.S. presenting talks on antique quilt history, fabric dating classes and trunk shows as well as quilting classes. Learn more at utahquiltappraiser.blogspot.com. Send your comments and quilt questions to SandraStarley@outlook.com
Zigzag patterns for the win!

September 2022

Covering Quilts

Zigzag patterns for the win!

​

by Sandra Starley


If you are like me, you find antique quilts very inspiring. Old quilts can really get your creativity flowing. Studying antique quilts is a wonderful way to not only understand history but also learn from early quilt makers. They did not have all the sewing tools and quilting gadgets that we have today, but they created some amazing quilts. And many of the most striking feature zigzags. The most commonly seen use of zigzags is a strippy vertical zigzag setting. Next most popular are horizontal settings followed by framing zigzag borders especially outer borders. The setting usually involves alternating light and dark triangles to create a zigzag look though rectangles, V blocks, and Flying Geese can also be used to make zigzags. Other blocks like Log Cabins can also create zigzags with careful color placement.

Zigzag patterns tend to have strong contrasting colors which along with the movement of the design gives a dynamic appearance to the quilt. Another name for the block or setting is Streak of Lightning, which gives a clue to its electric or graphic presence. No wonder zigzags are a very popular part of the quilting tradition. Quilt historians have noted that zigzags yield dramatic and showy quilts.


UFO quilt

Cactus Basket Zigzag Quilt

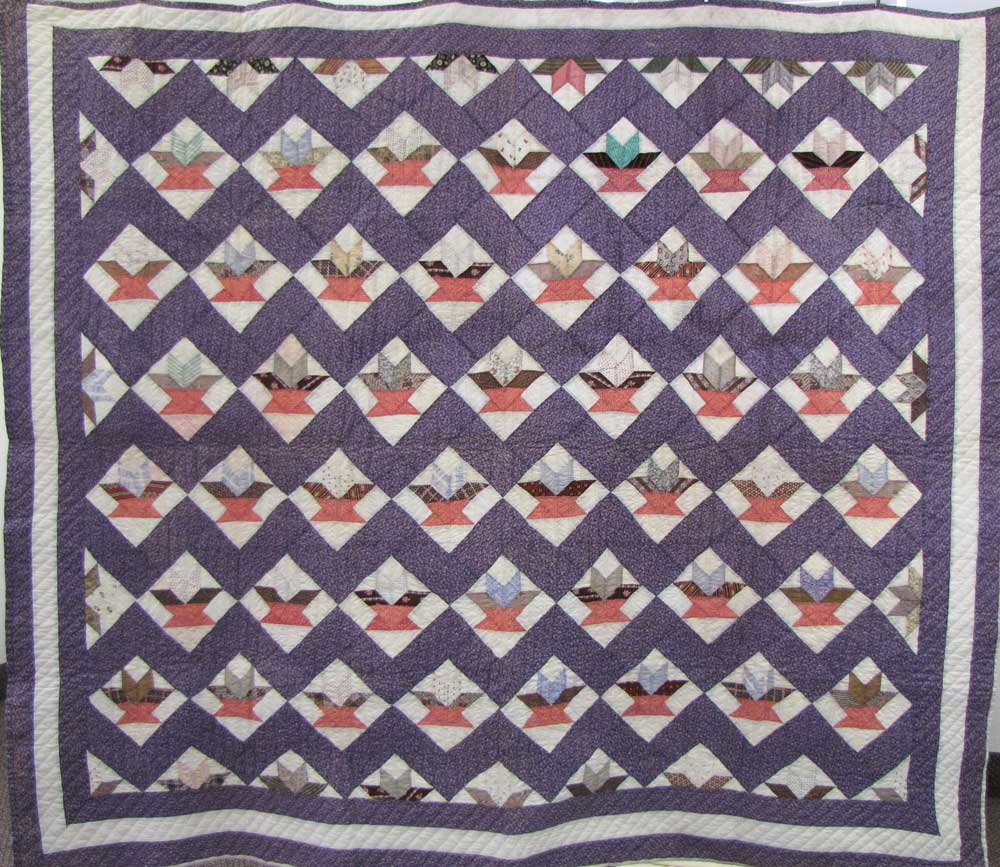
Circa 1870 Cactus Basket quilt in horizontal zigzag setting. From the Starley Antique Quilt Collection. (Image courtesy of the author)

Everything is better with zigzags!

The blocks can be used alone for a great effect but are wonderful when paired with other blocks to frame and highlight them. One thing you can learn from early quilters is that even the simplest blocks will look amazing if joined in an alternating arrangement with zigzags. When doing antique trunk shows, I have noticed that the audience always gasps with joy when I pull out a quilt with a zigzag setting. A particular crowd favorite is the pictured quilt, a circa 1870 Cactus Basket quilt with a horizontal zigzag setting. The purple rectangles create a triangular look that sets off the little scrappy baskets. Another reason zigzag settings are so effective is that they place the blocks on point, which adds movement and interest. And pro-tip: blocks go much farther when set on point. And combined with the volume added when they are framed with a medium sized zigzag sashing, and you will see fast progress.


Simply magic

As noted earlier, there are many different ways to create zigzag or chevron quilts or to add zigzag sashing or borders to other blocks. The simplest way is to cut light and dark triangles and piece them together in rows or strips. The trick is to offset them a half step (half the size of the triangle) when joining rows to create the zigzag shape. You will need two rows to see the zigzag. When making the zigzag set you also join the blocks with an offset with partial blocks at the beginning and end of each row. The offset is the secret sauce of the zigzag. There are several online tutorials that will help you in creating zigzag quilts or settings, do a search for zigzag quilt pattern and you’ll find plenty of guidance. You will find wonky zigzags and even zigzags that zig and zag across a quilt in modern diagonal patterns. And be sure to also do a search for antique zigzag quilts for a lot of wonderful historical inspiration. Remember to have fun and learn from the past while quilting for the future. My motto is: “you can’t go wrong with a zigzag quilt!” Give it a try.

Sandra Starley is nationally certified quilt appraiser, quilt historian, and avid antique quilt collector. She travels throughout the U.S. presenting talks on antique quilt history, fabric dating classes and trunk shows as well as quilting classes. Learn more at utahquiltappraiser.blogspot.com. Send your comments and quilt questions to SandraStarley@outlook.com
Learn something new – take a quilt class

August 2022

Covering Quilts

Learn something new - take a quilt class

​

by Sandra Starley


This year, I have been focusing my column on the benefits of learning new quilting skills whether to stretch your brain or finish old projects. One great way to learn a new technique or method is by taking a quilting class. There are many choices available for taking quilt classes and truly something for everyone.

Whether you have never sewn a stitch or are an expert sewist, there is a class for you. They range from traditional, in-person classes available at quilt shops, guilds, and shows (local, regional, or national venues) to the now-many online computer selections (live or recorded/on demand).

It should come as no surprise that online classes have become an even more popular option with the Zoom-ifaction of life. As we have become more used to and confident using Zoom and other online opportunities, the demand for online classes, which exploded due to necessity during the pandemic, continues to grow.

While in-person classes are coming back as people enjoy meeting together, the ease of learning from home and sewing in your comfy pajamas is hard to beat. Online classes are perfect if you are trying to fit sewing into a busy schedule as you can find recorded classes to watch when you want.

Beginning Quilters

If you are a beginner, it is good to start with a basic class to get acquainted with Quilting 101. You will learn about tools like rotary cutter and rulers, cuts of fabric, different techniques, and the super-important quarter-inch seam allowance, a necessary part of making pieces fit together. Starting off with a good foundation will help lessen the learning curve.
Quilting does have its own language, and getting an inside scoop helps make it less mysterious and more fun! A class at a local shop or guild will help you meet new quilty friends, too.

UFO quilt

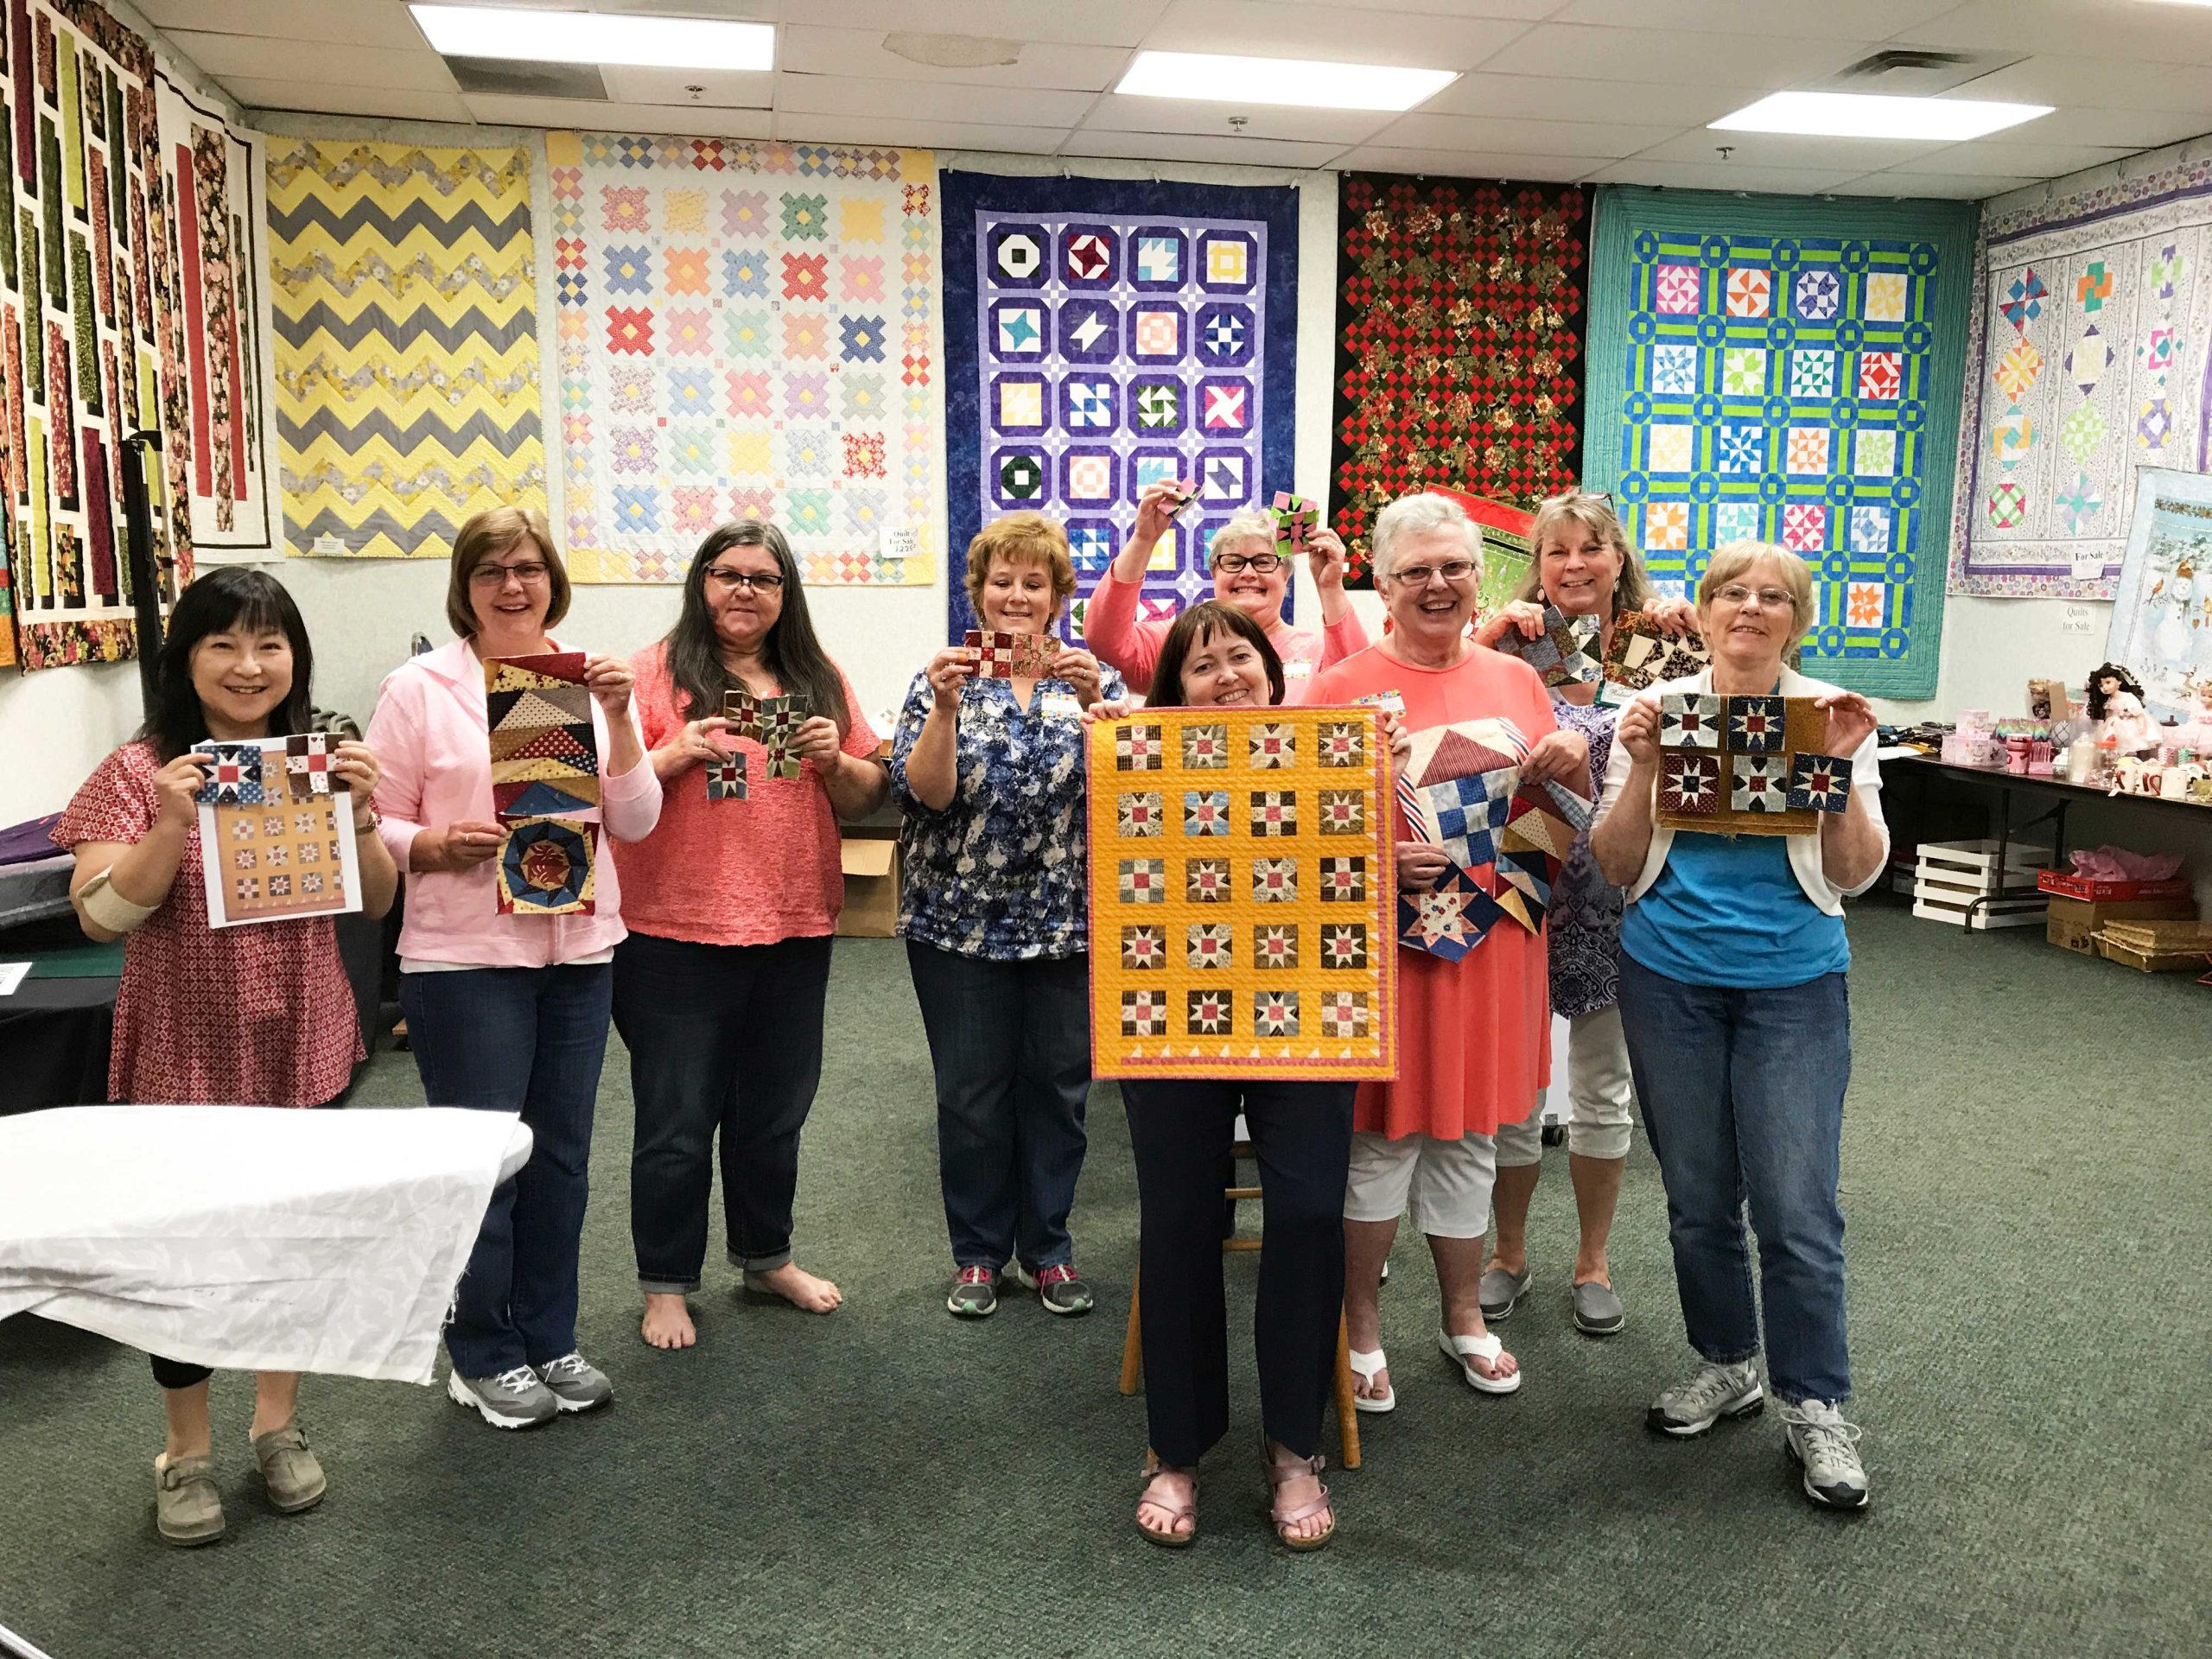
Sandra Starley’s Cheddar Stars Quilt Class,

Sandra Starley’s Cheddar Stars Quilt Class, Pieces and Patches Quilt Guild, Jackson, MI, 2017. (Image courtesy of the author)

Intermediate to Advanced

You know the basics; now take your quilting to a new level. A class can help you begin that quilt you have always wanted to make but been scared to start, like a New York Beauty or hand applique project.
Challenge yourself to learn a technique you have never tried before or a new style. If you have always done hand quilting or applique, try machine quilting or vice versa.

General Guidelines

In-person or online - make sure you have all the necessary class supplies. Get the supply list and ask questions about what you will need for the class time. The class list may include what you will need for the whole quilt project like batting and backing, but you won’t need those in the basic piecing class. But they are essential for a machine quilting class.

Check on whether a machine is needed or provided. You want to be ready to sew and learn. This applies to all classes both with hand or machine work. It is especially important to make sure your sewing machine is in good working order and that you know how to use it. If you are a newbie, do some practice sewing before class so you are not frustrated in class.

Quilting is supposed to be enjoyable, and being prepared helps that happen. Come ready to learn and try different ways to create, even if you have been sewing for years. Keep an open mind and you will be pleasantly surprised with what you can see from a new perspective.

Do not forget the chocolate or your favorite treat. You need to keep up your energy for all your sewing fun!

Sandra Starley is nationally certified quilt appraiser, quilt historian, and avid antique quilt collector. She travels throughout the U.S. presenting talks on antique quilt history, fabric dating classes and trunk shows as well as quilting classes. Learn more at utahquiltappraiser.blogspot.com. Send your comments and quilt questions to SandraStarley@outlook.com
UFO, PHDS, and WIPS, oh my! Finding and finishing your unfinished projects

July 2022

Covering Quilts

UFO, PHDS, and WIPS, oh my! Finding and finishing your unfinished projects

​

by Sandra Starley


What is in your work room?

If you are like most quilters, you have lots of partial projects, leftovers or orphan blocks lurking in your sewing room. Does it seem like you have started a college with all the PHDs you have stashed away? You may not know all the quilting lingo, but you likely have many of these items. First, let us define some terms: UFOs = unfinished objects, PIGs = projects in grocery sacks, WIPS = works in progress, PHDs = projects half done. You have probably noticed a connection with all these terms: projects started and then discarded. Why not start a search-and-rescue mission to find and finish those orphaned items or give them a new home?

Time to round-up the orphans and finish those projects!

First step – do an inventory of all those bags, baskets, and bins and see what treasures are hiding away. You will most likely be surprised at how many projects are almost done. Decide what needs to be completed on each; for example, make two more blocks, sew finished blocks together, quilt, sew on binding, etc. It is exciting to have projects you can now easily finish by doing a task or two.

UFO quilt

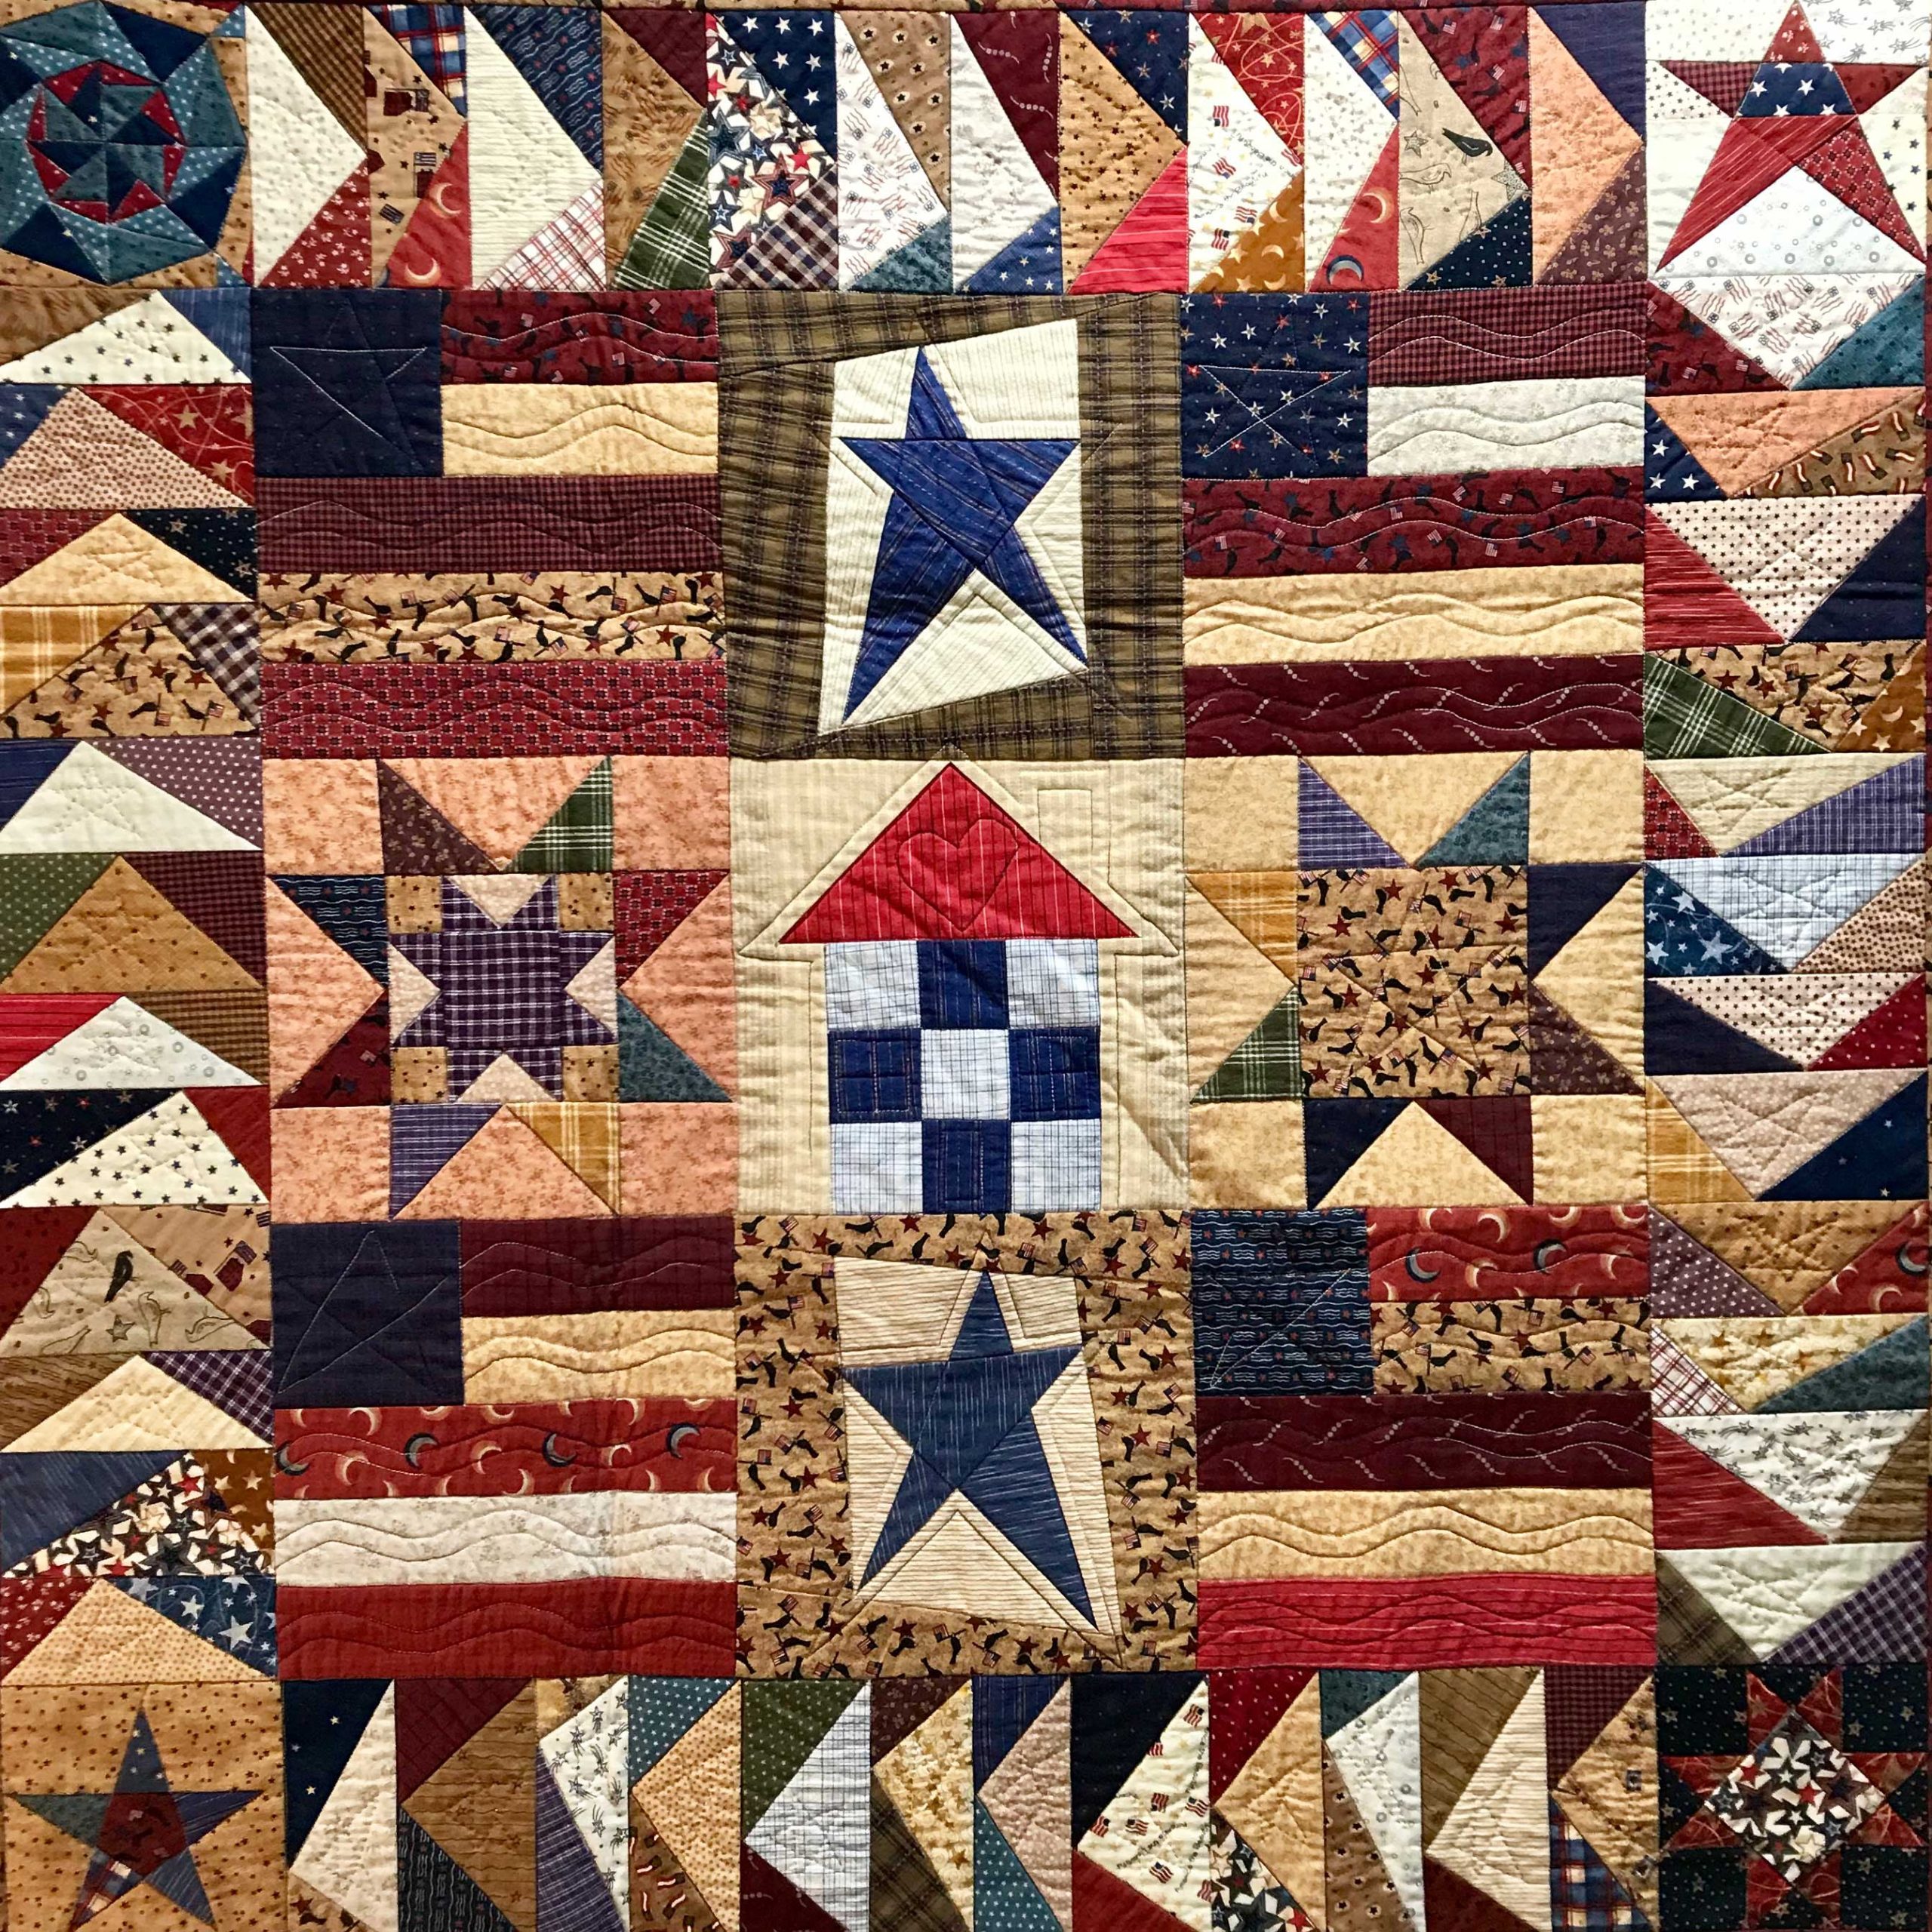
Home of the Brave

“Home of the Brave,” created with UFO blocks from several different classes. 42” x 42.” Sandra Starley, 2002 (Pattern available).
Image courtesy of the author

Second step – figure out which projects you WANT to complete and how you want to finish them. You may have started a quilt in a workshop and made a few blocks, but they no longer appeal to you. Perhaps you learned a skill or technique from that class, and you can now pass the blocks on to someone who will use them to make a fabulous quilt. Or maybe you don’t want to make the full quilt, but those four blocks would be perfect for creating an awesome project bag for another quilt.

Third step – find new homes for the projects that don’t spark joy. Unfinished projects have a tendency to weigh you down and make you feel guilty. Keep the items that make you smile and find new purposes or lives for the others. Guilds often have fundraising yard sales or collect orphan blocks for charity quilts and would love your blocks or tops.

Start playing!

Remember quilting is supposed to be joyful. You can gather up those partial blocks and have fun creating a scrappy back for a top that is also waiting to be finished.


Challenge yourself to learn some new skills that have you stuck on a particular UFO. Why leave a quilt half done because you are missing the perfect fabric? Find a creative solution even if it is outside your comfort zone. Or trade tasks with a quilting friend. If binding is a dreaded chore for you, while your buddy loves it, work on her piecing while she binds your quilt. You’ll both get those PIGS done and out of the grocery sacks. Look at old projects with new eyes. Envision those orphan blocks as mini quilts, mug rugs, pillows. Now they can be quick gifts instead of projects half done. Applique a block to patch your jeans or adorn a jacket and you now have a fashion statement instead of UFO!

Strength in numbers

Challenge your guild or quilting group to work on creative finishes to those neglected projects. Work together to motivate progress and keep one another sewing. You can organize a UFO challenge and have prizes for those who complete their projects. You will be amazed at how much you can accomplish working with friends. SEW ON!


Sandra Starley is nationally certified quilt appraiser, quilt historian, and avid antique quilt collector. She travels throughout the U.S. presenting talks on antique quilt history, fabric dating classes and trunk shows as well as quilting classes. Learn more at utahquiltappraiser.blogspot.com. Send your comments and quilt questions to SandraStarley@outlook.com
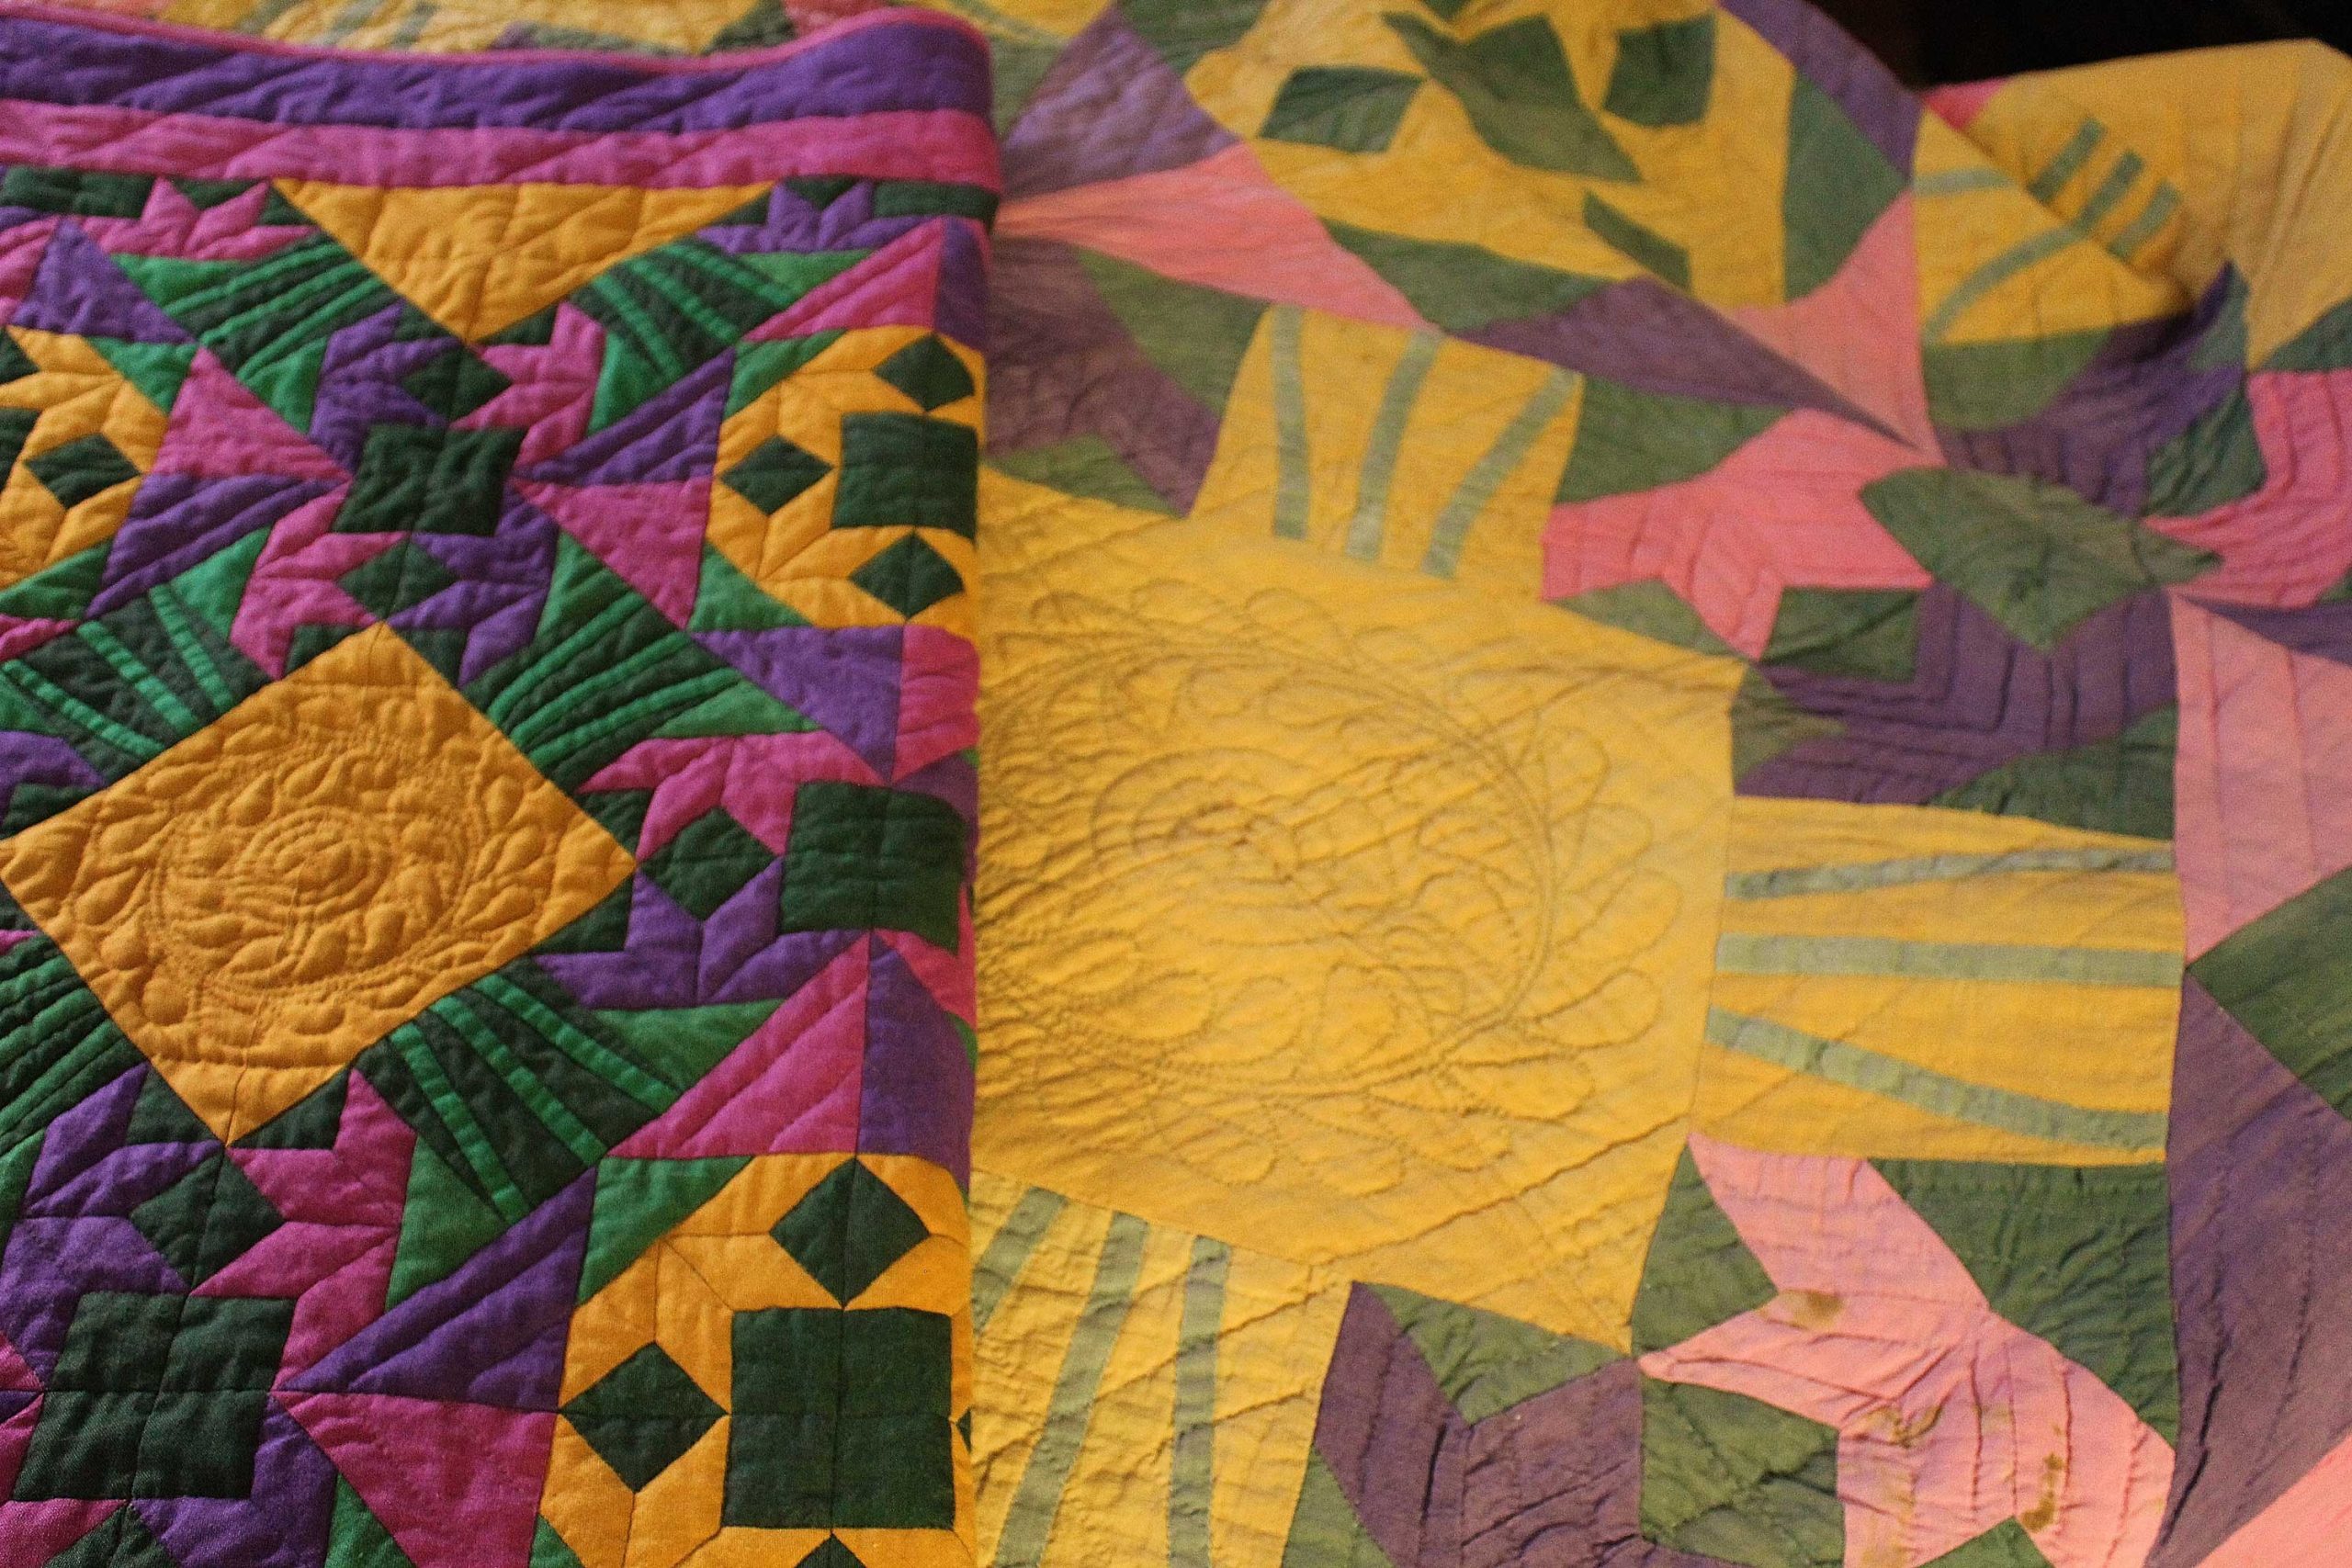
Quilting makes the quilt: Quilting by hand, machine or check?

June 2022

Covering Quilts

Quilting makes the quilt: Quilting by hand, machine, or check?

​

by Sandra Starley


Once you have your quilt top completed, there are many ways to finish it. You can hand quilt or machine quilt or some combination of the two. I like to outline quilt or “stitch in the ditch” by machine to stabilize and secure my quilt top. Then I hand quilt in open spaces where it will show and shine. This saves time and lessens the wear on your hands. Or you can quilt by check. Yes, the third option is paying someone else to quilt for you.

While this seems like a new concept, quilting for hire is nothing new. It goes back centuries, though at that time, commercial quilters quilted by hand, not machine. Now, most quilters-for-hire use machines, specifically longarm quilting machines. But there are still hand-quilters who will quilt for others. The most well-known groups are Amish, and there are brokers who arrange this service.
There are also individuals who offer their hand-quilting services. You may find hand-quilters at your local church or senior center. Note, younger quilters are also getting into hand-quilting.

Your quilt top is done, now what?

There are stitchers who just like to piece or applique and have stacks of tops waiting to be quilted and finished. Some feel these individuals are not true quilters and maybe we should call them toppers. Are you a quilter if you do not quilt? Yes, we even consider people who are collecting fabric and patterns to be quilters. Terminology point – quilting refers both to the general hobby, business, lifestyle, and obsession of sewing fabrics together as well as stitching two layers of fabric and batting together.


Hidden Lillies, hand and machine quilted

Hidden Lillies hand and machine quilted

Hidden Lillies, Sandra Starley 2018 (left), hand and machine quilted. At right, Antique Amish Carolina Lily, Starley Collection, hand-quilted. (Image courtesy of the author)

Experiment

Quilting by hand can be very Zen and can be done in many styles from tiny little stitches to “big stitch.” Big stitch is faster and more forgiving and a wonderful way to dip your toe in hand-quilting. Grab a needle and thread and give it a try.

Machine quilting can be done in myriad ways on all machines from antique treadles to fancy computerized machines that cost as much as a car. A good way to learn about machine-quilting is to attend a quilting show where you can test drive several machines. And many quilting shops offer training. After the class, you can rent the machine and quilt your quilt. You can also machine quilt on your home or domestic sewing machine.


Sew many decisions

One must choose a fiber and weight of batting (middle layer) and fabric for backing (third layer) to create a quilt sandwich. Batting could be a separate discussion and so could thread. There are various fibers: cotton, silk, polyester, blends, or invisible monofilament. Thickness or weight of thread is another decision. Thin thread blends in while heavier thread makes more of an impact. And you need to pick a color or several or find one that is variegated (number of colors in one thread).

And then you need to pick a quilting pattern or design. Outlining the piecing or applique or an overall design aka edge to edge? Or a custom design for each block or square? You can mark every stitch or try free motion (ad lib/improvisation style).

Quilting design decisions fill books. After looking at all these options, it is not surprising that a lot of tops are never finished or that many people send quilts to the machine quilter to figure things out.

Happy quilting or at least topping!

Sandra Starley is nationally certified quilt appraiser, quilt historian, and avid antique quilt collector. She travels throughout the U.S. presenting talks on antique quilt history, fabric dating classes and trunk shows as well as quilting classes. Learn more at utahquiltappraiser.blogspot.com. Send your comments and quilt questions to SandraStarley@outlook.com