Flying Geese classic quilting block helps quilts take flight
May 2025
Covering Quilts
Flying Geese classic quilting block helps quilts take flight
by Sandra Starley
Egyptian pyramids, Mayan Temples and myriad European churches feature this iconic triangle. This ancient shape was quickly adopted by very early quilt makers as a “flying goose” or “flying geese”: a triple-triangle unit comprised of a large center triangle with a background triangle on each side.
These units initially were stacked vertically in bars or strip sets and were made in the late 1700s and seen frequently in the 1830s and 1840s. This setting was a perfect way to showcase expensive imported fabrics like fancy floral chintz or a beautiful blue bird toile printed in England in 1790 found in a strippy flying geese quilt in my collection. That fabric depicts a pair of ducks set between strips of flying geese so the quilt reads across: duck, duck, goose (a quilty sense of humor is not a new thing).
And speaking of birds, it is not surprising that a shape so evocative of the V flight formation has become closely identified with geese. In 1915, quilt historian Marie Webster noted: “The resemblance of these lines, swiftly moving across the sky, to her neat rows of triangles supplied the quilt maker with her inspiration.” And in 1929, historian Ruth Finley also noted the triangle unit appears “so consistently in designs supposed to represent birds that the three-corned patch almost might be said to be a bird symbol.”
The simple flying geese three-triangle unit soon migrated into an attractive way to sash other pieced blocks or to add an interesting framing border around a quilt. From there, the geese evolved into pieced blocks, most commonly with four groups of geese flying in X or cross formations or even chasing around a square. But the sky is the limit for the versatile geese which can be set into spirals, circles, and arcs as seen in the award-winning example created by Donna Starley for the national Hoffman Fabric Challenge. The quilt creatively transforms the standard geese into a hybrid Drunkard’s Path/Flying Geese design. The curved piecing is a bit challenging, but the dramatic results are well worth the effort. Also check out the amazing work of quilter Gail Garber for stellar goosey inspiration.
More than 230 years since arriving on the quilting scene, flying geese are as popular as ever. A quick web search will give you years of inspiration and you will find many tutorials, patterns, and even specialty rulers just for making geese units. Modern quilters continue to expand the horizons of the pattern with many embracing the early simple strippy pattern while others let their wild geese fly with abandon across their quilts. You will find many modern flying geese patterns soaring across the web to inspire you. Surely one of the ways to make flying geese will be perfect for you; from hand piecing hand cut triangles, to machine foundation piecing, to various mass production techniques like the “four geese at a time.” My personal favorite method is foundation piecing as nothing beats it for precise points and sharp flying geese beaks. It also works wonderfully for the fun and funky wonky geese that add a delightful touch to any quilt. Now is the time to challenge yourself to give this classic pattern a try and add it to your next quilted creation. I think you will find out why it is a timeless block that will make your quilt shine.
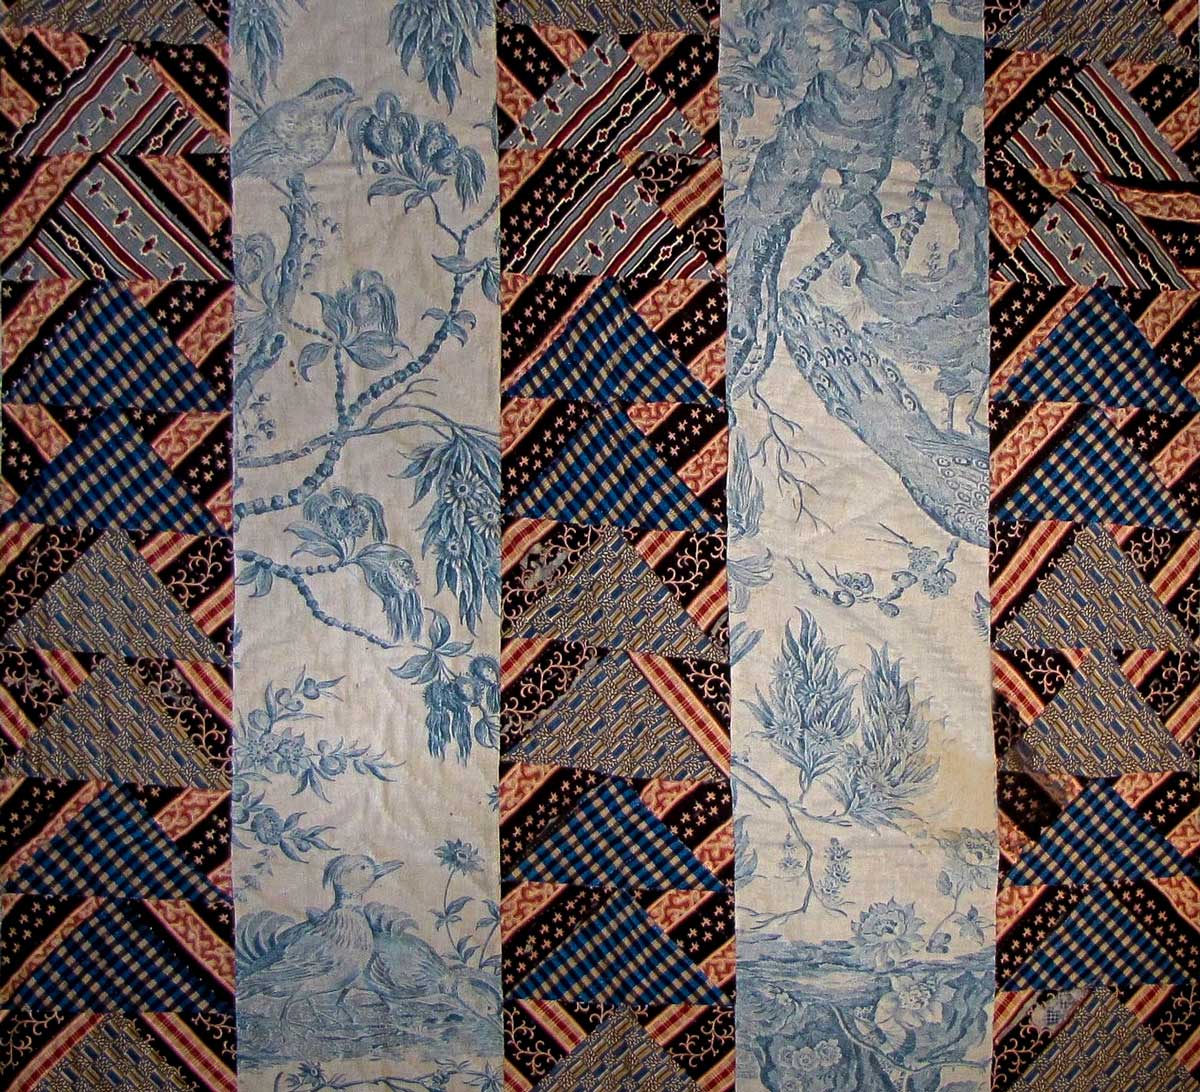
Detail of 1830 Flying Geese Toile Strippy Quilt. From the Sandra Starley Collection. (Image courtesy of the author)
Sandra Starley is nationally certified quilt appraiser, quilt historian, and avid antique quilt collector. She travels throughout the U.S. presenting talks on antique quilt history, fabric dating classes and trunk shows as well as quilting classes. Learn more at utahquiltappraiser.blogspot.com. Send your comments and quilt questions to SandraStarley@outlook.com